Showing posts with label Jesus. Show all posts

2/8/16

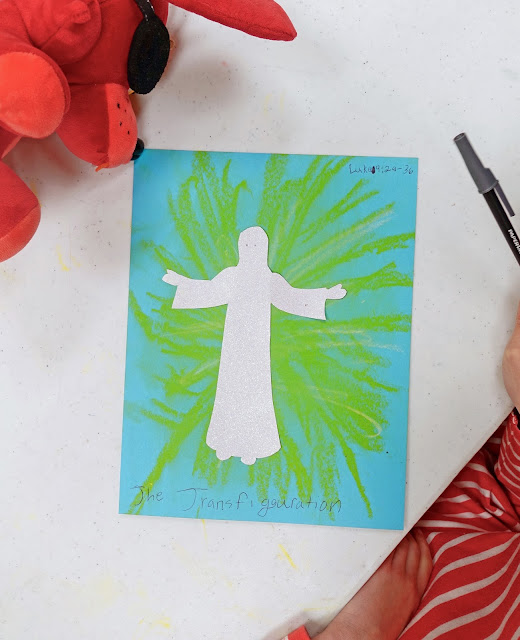
The Transfiguration

Luke 9: 28-36


When reading this lesson, the first craft idea that came to my mind was string art. You know, that cool method of tying string to nails on a board to highlight a shape? Here's a link to an example: string art. I would have loved to do it that way; however, that would have taken more prep and class time than I had available. So, I took that basic idea and found a way to do something similar.

The only difference in the two methods I will discuss is that one is achieved with oil pastels and is suitable for smaller children, and the other uses string and a craft needle, better suited for older children.

Materials Needed for 1st - 3rd Grade Version


Colored Card Stock                         Glitter Paper
Oil Pastels (yellow & white)     Pen
Glue                                               Scissors
Outline of Jesus (free download)     Paper Towel


Before Class Prep:

The first thing to do is draw a silhouette of Jesus. It doesn't have to be prefect. Any basic outline is fine. You may download mine (above) if you'd like. Cutout the shape.

Next, on the back of the glitter paper (found in the scrapbook section of Hobby Lobby or Michael's), trace the outline of Jesus.

Cut out one Jesus silhouette for each child.


Class Instructions:

1. Begin with a sheet of colored card stock and the yellow oil pastel. Starting at the center of the page,draw several lines going from the center out to the edges of the paper.

2. Using the paper towel, rub (or smear) the crayon to give it a fuzzy look.

3. Draw a few more lines with the white oil pastel and rub it to blend.

Note: Oil pastels work really well for this. They smear easily, as opposed to regular crayons. The down side is they can be slightly messy. Remind the kids not to drag their sleeves across the paper. Likewise, if you are worried about the color getting onto the tabletop, drape a cheap tablecloth or butcher paper over the tables before class.


4. Glue one Jesus silhouette onto the center.

5. The bible verse may also be written on the page if desired.


Materials Needed for 4th - 6th Grade Version:


Foam Sheets                                   Glitter Paper             
Pen                                                 Scissors
Glue                                               Craft Needle
Outline of Jesus (free download)  
Embroidery Floss (yellow - 2 or 3 per person)                      


Before Class Prep:

As with the 1st - 3rd grade craft, the first thing to do is draw a silhouette of Jesus. It doesn't have to be prefect. Any basic outline is fine. You may download mine (above) if you'd like. Cutout the shape.

Next, on the back of the glitter paper (found in the scrapbook section of Hobby Lobby or Michael's), trace the outline of Jesus.


Cut out one Jesus silhouette for each child.

Two extra steps are needed for this version. On the back of each Foam Sheet, trace the silhouette with dots as shown below.


Next, add random dots, some along the edges and some closer in, all the way around.


Class Instructions:

1. Thread the needle with a long strand of floss-but not too long! Using the dots for needle placement, stitch from the silhouette dots to the surrounding dots. When one strand ends, tie a new strand to it until the entire picture is covered as pictured below.


2. Glue the silhouette of Jesus in the center.


NOTE:  All images, text and printables contained herein are copyright protected. This material is for your personal use only. I encourage you to print or pin from this site whenever you would like as long as it is credited and linked back to EasyBreezySundaySchool.blogspot.com. Failure to link back and credit my site constitutes a copyright violation.  Thanks so much!


1/3/16

Young Jesus Gets Left Behind Game

Luke 2: 41-52


Today's lesson is about when Mary and Joseph accidentally left a twelve-year-old Jesus behind in Jerusalem after a festival. When they returned to Jerusalem and found him in the temple, he asked them, "Did you not know that I must be in my Father's house?"

Maybe it's the approaching winter weather that has me aching to get active, or maybe it's the fact that I've just spent several weeks being incredibly lazy and eating too many holiday treats, but whatever the motivating factor was, I decided to make today's lesson memorable by giving the kids a hands-on experience with searching for Jesus.  

Before class, I dressed a Ken doll as a twelve-year-old Jesus and hid him in the sanctuary. During our lesson, we talked about how panicky Mary and Joseph must have been when they realized Jesus was not with them on their journey home. In telling the story, I explained how Mary and Joseph probably went to each family member asking, "Is Jesus with you? Have you seen him?" I looked at each child and asked these questions, as if I were Mary, and each child stared back at me, instinctively playing along, replying "No," and shaking their heads. When everyone was sufficiently hyped up, I led them into the sanctuary and told them to go find Jesus. They frantically raced about the pews, the podium, the choir area, and the baptismal font until someone found him in the transept sitting beside a plant.

"Again, again!" they shouted. Of course everyone wanted to be the hider, so the kids took turns hiding the doll for several more rounds. 

Things to consider: 
--Make sure the rector/pastor doesn't mind the sanctuary becoming a temporary play ground.
--Remind the children the sacraments are holy and should not be disturbed if they are present.
--Do not hide Jesus inside anything (he must be visible without moving other objects).
--No screaming (This is still a place of worship).


NOTE:  All images, text and printables contained herein are copyright protected. This material is for your personal use only. I encourage you to print or pin from this site whenever you would like as long as it is credited and linked back to EasyBreezySundaySchool.blogspot.com. Failure to link back and credit my site constitutes a copyright violation.  Thanks so much!


10/3/15

Create a board game in minutes!

Mark 10: 13-16
Jesus said, "Let the little children come to me...."


In today's lesson the disciples try to turn the children away when they come to see Jesus. Jesus becomes agitated with them saying, "Let the children come to me...."

Even though this story is only three verses long without many details, it can still be turned into a fun board game. And with the help from a few online sources, it can be done in a matter of minutes!

Materials:

Card stock (for the board)
Printer
Blank board game printable from Lovetoknow 
Clip art of Jesus 
     Two of my favorite bible clip art sources:
        Bible People from The Activity Mom
        Free Bible Clip Art from Phillip Martin Clip Art
Small items for game pieces
A spinner or die

Instructions:

This is so easy! 

1. Follow the above link to the blank board game selections from Lovetoknow. Choose the game board desired and download. 

2. Go to one of the clip art sources above. Download a clip art of Jesus.

3. Open the game board in Photoshop or similar program.

4. Open the clip art of Jesus file and drag to the game board, placing it in the last game space.

5. Add items to the game board to make players lose a turn, go back, go ahead, etc.

It may be difficult to read the ones I used in the picture above. They are listed below in the order they appear on the game board:
            
             Your mother guides you to Jesus. Slide ahead
              3 spaces.

             There are so many people in the crowd that you
              trip, losing your place in line. Go this way.

             One of the disciples tells you to go away. Go
              around.

              A kind old man steps aside to let you through.
              Go ahead 5 spaces.

              Jesus calls you forward. Move ahead.

              One of the disciples chases you. Go back, but 
              do NOT take the detour.

               A disciple returns you to your mother. Go back.

               You can almost see Jesus. Slide through the 
               crowd, advancing 4 spaces.

               Jesus tells the disciples to let you come to Him.
               Move ahead 3 spaces.

6. Print your newly created game on the card stock.

Playing The Game:
Each player takes turns spinning the spinner, or rolling the die, to determine the number of spaces to advance. The first player to reach Jesus wins.


We used peg people I painted a few years ago for another game as our player pieces, but anything could work. Our Bingo Buttons would work just as well.


NOTE:  All images, text and printables contained herein are copyright protected. This material is for your personal use only. I encourage you to print or pin from this site whenever you would like as long as it is credited and linked back to EasyBreezySundaySchool.blogspot.com. Failure to link back and credit my site constitutes a copyright violation.  Thanks so much!


11/30/14

Mosaic Of Jesus

Posted with artist's permission                          
Suffering Servant
by Marcella Pallekara


Today's craft is one of my favorites for many reasons. First, it was inspired by the above mosaic, which I totally love. When I contacted the artist, Marcella Pallekara, to ask for permission to post her work, she was so gracious and kind that I couldn't help but be intrigued by her. Naturally, that prompted a visit to her blog, Paint Paste Pray. I have to say, I am in complete awe of her many talents. Her blog has inspired me both artistically & spiritually. 

The second reason I love today's craft is because it compliments every single Bible lesson. Yes, every... single... one. 


And the third reason, well, it's fun!


So, what is the craft you undoubtedly are asking by now? We are going to make our own mosaics of Jesus, of course. How can you look at Marcella's masterpiece above and not want to give it a try?


Materials needed:

Magazine pages (tear out ahead of time)
Glue/Glue sticks
Construction paper
Optional items:
    Coloring pencils
    Magic markers
    Crayons
    Paint


Instructions:

Keep in mind that kids may initially feel overwhelmed by the task. Explain to them that the artist actually combined drawing with the glueing of paper scraps. Suggest they draw at least an outline of the face on their construction paper to serve as a guideline. Then show them how to look at the magazine pages not necessarily for the objects on the page, but for the colors and textures it contains. For example, I used Marcella Pallekara's piece to point out Jesus' brown hair. Then I located a page that contained a lovely brown burled wood coffee table. I tore the picture into several small pieces and demonstrated how to orient them to look like hair. Once they saw how to do this, they became excited and dove right in. I think being told to draw/paint/color some features took the pressure off of searching for the perfect piece.


We spent the entire Sunday school hour working on our projects and still didn't quite finish. The kids really embraced the experience. Many of them asked to take their picture home with a handful of magazine pages to complete later. I was impressed they weren't ready to quit. Here are the ones that finished in class and left their work to be displayed in the classroom:  


NOTE:  All images, text and printables contained herein are copyright protected. This material is for your personal use only. I encourage you to print or pin from this site whenever you would like as long as it is credited and linked back to EasyBreezySundaySchool.blogspot.com. Failure to link back and credit my site constitutes a copyright violation.  Thanks so much!