Hello, everyone! Thank you so much for continuing to visit my blog! It has been a long time since I last posted. Much has happened in my life. God is so good! The traffic to this blog is considerable, and although I have not been able to post new content lately, I want the information already here to stay live for anyone looking for such topics.
Having Download Problems?
I have been receiving notices for download requests. You should not have to get my permission to download the items I have set up. They are already setup for you to print freely. If you are having trouble downloading, please email me and I will send you a pdf of the file you want. I have tried emailing several of you, but I get a notice that the receiving server does not accept unauthorized communication. So, all of that to say, please add me to your list of acceptable people to make sure you can receive my reply.
Blessings!

3/6/19
9/15/16
Construction
Please bear with me while I
redesign the blog. I'm itching for a little change.
Many blessings,
T.


4/11/16
Jesus Appears to Desciples While Fishing
John 21:1-14


Today's lesson tells the story of the disciples fishing all night to no avail. The next morning, Jesus calls to them from the shore with instructions to cast their nets. Upon doing so, their nets overflow with fish.
This craft will go well with any of the many bible lessons containing fish.
Materials:

Color Foam Sheets (or colored paper)
Card board or any stiff board
Scissors
Pen
Glue
Fish drawing (get my template here)
Googly eyes (not pictured)
Before Class Prep:
I used foam sheets for this craft because I wanted a rigid, durable fish. This craft could just as easily be made with colored paper. Using foam sheets will require the fish to be individually traced by hand, whereas using regular paper allows the fish template to be run through a copier.
1. Print the fish template above, if you don't have a fish outline you'd like to use.
2. Trace the fish parts onto the foam sheets and cut out.
3. Cut the fish body piece into multiple strips cutting from top to bottom. I cut my in wavy strips, but straight or slightly concave works well also.
4. Draw the mouth onto the head pieces, tail marks on the tails, and fin marks on the fins.
5. Cut the cardboard into strips seven or eight inches long.

Class Construction:
1. Let the children pick one fish head, tail, fin and googly eye(s).
2. Give them one strip of cardboard.
3. Ask them to first glue the head onto one end of the cardboard strip.
4. Next they are to pick body strips of different colors and glue them to the cardboard arranging them from small to large to small again down the strip.
5. Finish it off with a tail, fin, and googly eye(s).


2/28/16
The Parable Of The Barren Fig Tree
Luke 13: 6-9


Trees are mentioned in the bible many times. Adam and Eve's apple tree, the barren fig tree, and Zacchaeus's sycamore tree are a few of the most famous. Today we are going to make a 3D tree to go along with any lesson about trees. I once posted a tree craft (found here) using paper bags; however, I did not have any bags on hand this time, so I came up with this alternative to save myself a trip to the store.
Most of my crafts are targeted toward 1st through 5th graders, but today's craft would also be good for kindergarteners.
Materials needed:

Cardstock
Scissors
Glue
Green felt or construction paper
Before Class Prep.:
1. Download and print tree templates onto the front and back of the cardstock, or draw your own. Two pages are needed for each tree/student.
2. Trim the bottom of each page so the tree roots are at the very bottom edge of the page.
3. Cut a rough tree foliage shape around the branches.
4. On half of the pages, cut a long slit from the top middle down to midway on each tree trunk.
5. On the other half of the pages, cut a long slit from the bottom middle to midway up each trunk.
See pictures below. Each tree is formed by sliding together one upper cut tree and one lower cut tree.


I went ahead and put the trees together before class so I did not have to fumble with matching up top cut and bottom cut pages while in class. Once the trees are together they collapse down flat again without having to take them apart. This made it easy to pass out both pages to each child at the same time.
Class Instructions:
1. Give each child two tree pages.
2. Ask the children to take the tree pages apart and decorate. They have the option of coloring the tree leaves or cutting leaves from the felt/construction paper and glueing.
3. Slide the two pages back together and the tree is complete.

NOTE: All images, text and printables contained herein are copyright protected. This material is for your personal use only. I encourage you to print or pin from this site whenever you would like as long as it is credited and linked back to EasyBreezySundaySchool.blogspot.com. Failure to link back and credit my site constitutes a copyright violation. Thanks so much!
2/8/16
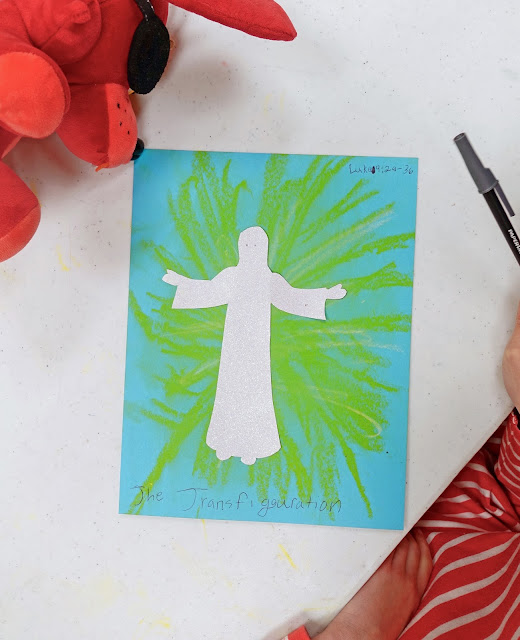
The Transfiguration
Luke 9: 28-36

When reading this lesson, the first craft idea that came to my mind was string art. You know, that cool method of tying string to nails on a board to highlight a shape? Here's a link to an example: string art. I would have loved to do it that way; however, that would have taken more prep and class time than I had available. So, I took that basic idea and found a way to do something similar.
The only difference in the two methods I will discuss is that one is achieved with oil pastels and is suitable for smaller children, and the other uses string and a craft needle, better suited for older children.
Materials Needed for 1st - 3rd Grade Version

Colored Card Stock Glitter Paper
Oil Pastels (yellow & white) Pen
Glue Scissors
Outline of Jesus (free download) Paper Towel
Before Class Prep:
The first thing to do is draw a silhouette of Jesus. It doesn't have to be prefect. Any basic outline is fine. You may download mine (above) if you'd like. Cutout the shape.
Next, on the back of the glitter paper (found in the scrapbook section of Hobby Lobby or Michael's), trace the outline of Jesus.
Cut out one Jesus silhouette for each child.
Class Instructions:
1. Begin with a sheet of colored card stock and the yellow oil pastel. Starting at the center of the page,draw several lines going from the center out to the edges of the paper.
2. Using the paper towel, rub (or smear) the crayon to give it a fuzzy look.
3. Draw a few more lines with the white oil pastel and rub it to blend.
Note: Oil pastels work really well for this. They smear easily, as opposed to regular crayons. The down side is they can be slightly messy. Remind the kids not to drag their sleeves across the paper. Likewise, if you are worried about the color getting onto the tabletop, drape a cheap tablecloth or butcher paper over the tables before class.

4. Glue one Jesus silhouette onto the center.
5. The bible verse may also be written on the page if desired.
Materials Needed for 4th - 6th Grade Version:

Foam Sheets Glitter Paper
Pen Scissors
Glue Craft Needle
Outline of Jesus (free download)
Embroidery Floss (yellow - 2 or 3 per person)
Before Class Prep:
As with the 1st - 3rd grade craft, the first thing to do is draw a silhouette of Jesus. It doesn't have to be prefect. Any basic outline is fine. You may download mine (above) if you'd like. Cutout the shape.
Next, on the back of the glitter paper (found in the scrapbook section of Hobby Lobby or Michael's), trace the outline of Jesus.
Cut out one Jesus silhouette for each child.
Two extra steps are needed for this version. On the back of each Foam Sheet, trace the silhouette with dots as shown below.

Next, add random dots, some along the edges and some closer in, all the way around.

Class Instructions:
1. Thread the needle with a long strand of floss-but not too long! Using the dots for needle placement, stitch from the silhouette dots to the surrounding dots. When one strand ends, tie a new strand to it until the entire picture is covered as pictured below.


NOTE: All images, text and printables contained herein are copyright protected. This material is for your personal use only. I encourage you to print or pin from this site whenever you would like as long as it is credited and linked back to EasyBreezySundaySchool.blogspot.com. Failure to link back and credit my site constitutes a copyright violation. Thanks so much!
When reading this lesson, the first craft idea that came to my mind was string art. You know, that cool method of tying string to nails on a board to highlight a shape? Here's a link to an example: string art. I would have loved to do it that way; however, that would have taken more prep and class time than I had available. So, I took that basic idea and found a way to do something similar.
The only difference in the two methods I will discuss is that one is achieved with oil pastels and is suitable for smaller children, and the other uses string and a craft needle, better suited for older children.
Materials Needed for 1st - 3rd Grade Version

Colored Card Stock Glitter Paper
Oil Pastels (yellow & white) Pen
Glue Scissors
Outline of Jesus (free download) Paper Towel
Before Class Prep:
The first thing to do is draw a silhouette of Jesus. It doesn't have to be prefect. Any basic outline is fine. You may download mine (above) if you'd like. Cutout the shape.
Next, on the back of the glitter paper (found in the scrapbook section of Hobby Lobby or Michael's), trace the outline of Jesus.
Cut out one Jesus silhouette for each child.
Class Instructions:
1. Begin with a sheet of colored card stock and the yellow oil pastel. Starting at the center of the page,draw several lines going from the center out to the edges of the paper.
2. Using the paper towel, rub (or smear) the crayon to give it a fuzzy look.
3. Draw a few more lines with the white oil pastel and rub it to blend.
Note: Oil pastels work really well for this. They smear easily, as opposed to regular crayons. The down side is they can be slightly messy. Remind the kids not to drag their sleeves across the paper. Likewise, if you are worried about the color getting onto the tabletop, drape a cheap tablecloth or butcher paper over the tables before class.

4. Glue one Jesus silhouette onto the center.
5. The bible verse may also be written on the page if desired.

Materials Needed for 4th - 6th Grade Version:

Foam Sheets Glitter Paper
Pen Scissors
Glue Craft Needle
Outline of Jesus (free download)
Embroidery Floss (yellow - 2 or 3 per person)
Before Class Prep:
As with the 1st - 3rd grade craft, the first thing to do is draw a silhouette of Jesus. It doesn't have to be prefect. Any basic outline is fine. You may download mine (above) if you'd like. Cutout the shape.
Next, on the back of the glitter paper (found in the scrapbook section of Hobby Lobby or Michael's), trace the outline of Jesus.
Cut out one Jesus silhouette for each child.
Two extra steps are needed for this version. On the back of each Foam Sheet, trace the silhouette with dots as shown below.

Next, add random dots, some along the edges and some closer in, all the way around.

Class Instructions:
1. Thread the needle with a long strand of floss-but not too long! Using the dots for needle placement, stitch from the silhouette dots to the surrounding dots. When one strand ends, tie a new strand to it until the entire picture is covered as pictured below.

2. Glue the silhouette of Jesus in the center.


NOTE: All images, text and printables contained herein are copyright protected. This material is for your personal use only. I encourage you to print or pin from this site whenever you would like as long as it is credited and linked back to EasyBreezySundaySchool.blogspot.com. Failure to link back and credit my site constitutes a copyright violation. Thanks so much!
1/16/16
Jesus turns water into wine
John 2:1-11


NOTE: All images, text and printables contained herein are copyright protected. This material is for your personal use only. I encourage you to print or pin from this site whenever you would like as long as it is credited and linked back to EasyBreezySundaySchool.blogspot.com. Failure to link back and credit my site constitutes a copyright violation. Thanks so much!

Today I have an activity that will shock your kids! Keep reading and I will show you how to turn water into wine while your students watch in amazement. The second half of today's post will include a game.
To set the mood for the lesson, I served snacks to the kids that might have been found at the Cana wedding feast.
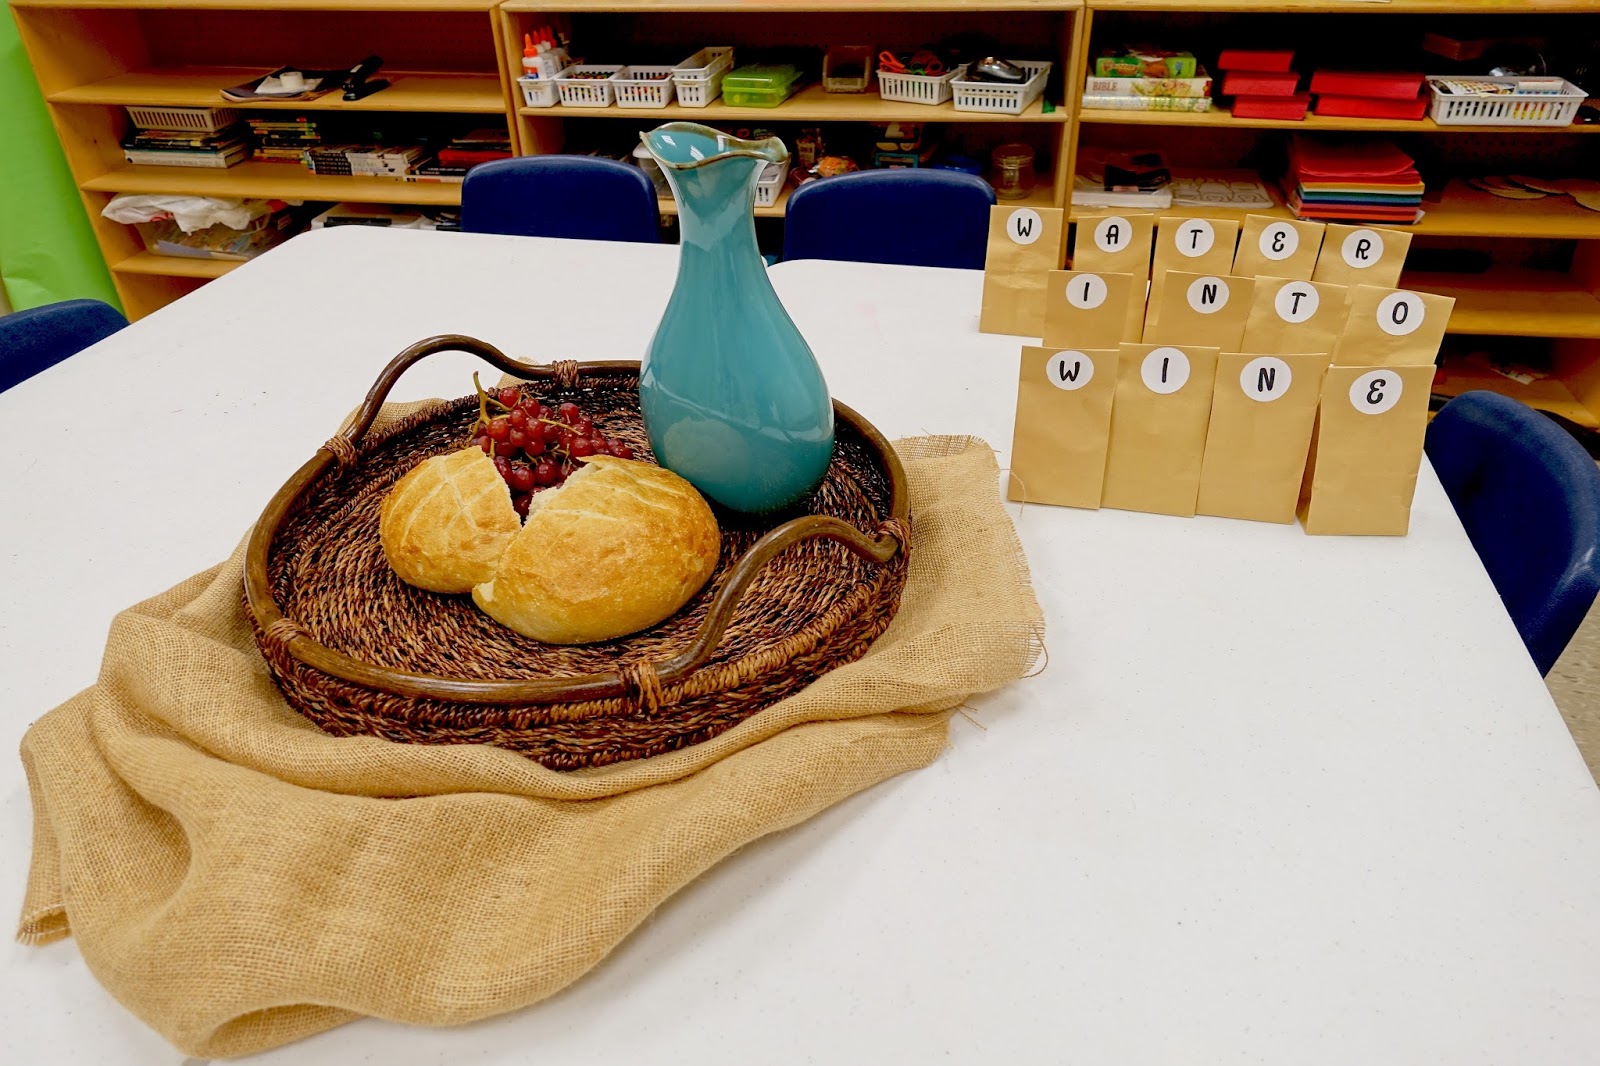
We compared wedding receptions of today to those in bible times. One huge difference is their feasts lasted for seven days. Can you imagine!
As I segued into the lesson, I began acting out the events as I told the story. I lifted the empty, opaque pitcher from the table and tipped it forward for all to see it's lack of contents as I explained how Mary told Jesus there was no more wine. Fortunately, my pitcher had a narrow neck making the the bottom difficult to see. I walked across the room and collected a jug of water as Jesus told the servants to fill the pots to the brim. I did not fill my vessel quite that full :). The kids watched as the clear water entered my opaque pitcher. Next, I handed out brown paper bowls I found at Hobby Lobby, explaining that cups back then were made from pottery. The brown paper bowls were the closest thing I could find at a reasonable price that looked vaguely similar to pottery cups.

I then poured the water from the opaque pitcher into their cups, only it wasn't water any more. It was wine (aka Kool-Aid). The kids could not believe their eyes! It was quite funny. What they had not known was that before class, I added Kool-Aid drops to the bottom of the empty opaque pitcher. This is why the pitcher absolutely has to be opaque.

We ate bread and grapes with our Kool-Aid while I finished telling the story. Of course, they could not figure out how I had managed this miracle, so I let them in on my secret.
Materials needed for the water transformation:
1 clear pitcher or bottle of water
1 Opaque pitcher
Kool-Aid mix (drops or powder will work)
Game
The game for this lesson is quite easy.
Items Needed:
13 Questions (Click for pdf)
13 Small Goody Gags

2 Buzzers (they come in a 4 pack, but we only need 2 for this game)

How to play:
Set up an area for two players to face each other with a buzzer in front of each.
Read the first question aloud.
The first person to hit his/her buzzer gets to answer the question.
If they get the answer correct, they may choose a paper bag and return to their seat. They may open the bag immediately. A new player fills the empty position.
If the player answers incorrectly, their opponent may try to answer the question. If that player answers correctly, he/she selects a bag and returns to their seat with a new player taking the empty place at the buzzer.
If neither player answers correctly, give the correct answer and move on to the next question. This question may be used again later.
Play continues with two players battling at a time until all 13 questions have been answered correctly.
There are 13 questions and 13 bags. Each question may only be answered correctly once.
The Goody Bags
The goody bags may be filled with anything. I placed one piece of candy and one very small toy (erasers and animal crayons) in each bag.

I put a sticker on each mini bag to spell out the topic of the lesson (Water Into Wine). :) The stickers were printed on plain white sheet labels. I used my circle cutter to cut out the letters.
1/3/16
Young Jesus Gets Left Behind Game
Luke 2: 41-52

Today's lesson is about when Mary and Joseph accidentally left a twelve-year-old Jesus behind in Jerusalem after a festival. When they returned to Jerusalem and found him in the temple, he asked them, "Did you not know that I must be in my Father's house?"
Maybe it's the approaching winter weather that has me aching to get active, or maybe it's the fact that I've just spent several weeks being incredibly lazy and eating too many holiday treats, but whatever the motivating factor was, I decided to make today's lesson memorable by giving the kids a hands-on experience with searching for Jesus.
Before class, I dressed a Ken doll as a twelve-year-old Jesus and hid him in the sanctuary. During our lesson, we talked about how panicky Mary and Joseph must have been when they realized Jesus was not with them on their journey home. In telling the story, I explained how Mary and Joseph probably went to each family member asking, "Is Jesus with you? Have you seen him?" I looked at each child and asked these questions, as if I were Mary, and each child stared back at me, instinctively playing along, replying "No," and shaking their heads. When everyone was sufficiently hyped up, I led them into the sanctuary and told them to go find Jesus. They frantically raced about the pews, the podium, the choir area, and the baptismal font until someone found him in the transept sitting beside a plant.
"Again, again!" they shouted. Of course everyone wanted to be the hider, so the kids took turns hiding the doll for several more rounds.
Things to consider:
--Make sure the rector/pastor doesn't mind the sanctuary becoming a temporary play ground.
--Remind the children the sacraments are holy and should not be disturbed if they are present.
--Do not hide Jesus inside anything (he must be visible without moving other objects).
--No screaming (This is still a place of worship).
NOTE: All images, text and printables contained herein are copyright protected. This material is for your personal use only. I encourage you to print or pin from this site whenever you would like as long as it is credited and linked back to EasyBreezySundaySchool.blogspot.com. Failure to link back and credit my site constitutes a copyright violation. Thanks so much!
Subscribe to:
Posts (Atom)